
Well. Once you have finished the previous mission, End of An Era, and sat through the sequence playing out right after, the end to Mission 5, The Farewell, will come as no surprise. The how is a nice touch, yes, but we know what is coming. Well. With Providence done for and the ICA exposed, the gloves are off. Diana and 47 embark on a mission to Argentina to wipe out the last obstacle in the way of promoting Diana to becoming The Constant herself and dismantling the evil organization from within. A noble sentiment. Right?
SPOILER-ALERT
I have already played though HITMAN 3 on Professional difficulty, but I will only be detailing the missions in these posts. Nevertheless, there may be SPOILERS for the story itself.

The Location
The setting is actually one of the nicest in HITMAN 3. A luxurious party, with wine and dance and a lot of impeccably dressed, powerful people. An estate set in the gentle hills of Mendoza, Argentina, the sea, a gentle breeze and pretty flowers. It is, actually, rather relaxing and peaceful. So take your time to wander a bit and listen in on the conversations of the guests, if you want to. Enjoy the music, stake out the place and get yourself acquainted with the layout, environmental traps and potential escape routes.
The Targets
While it is nice to know who your targets are, in this mission they do not seem quite as important as what will happen after completing it. As mentioned, as the player, you do have an advantage over 47, which why this mission I just played through real quick the first time around because I was dying to learn what exactly would happen.
Since then, I paid a little more attention to the targets and especially during the “secret” Story Mission, Closing Statement, you will learn a little more of the two people 47 is set on eliminating.
The primary target is Don Archibald Yates, owner of the Yates Winery. And the reason he has to go is simply the fact that he also wants to become the next Constant, and therefore stands in 47 and Diana’s way of ending this conflict once and for all.
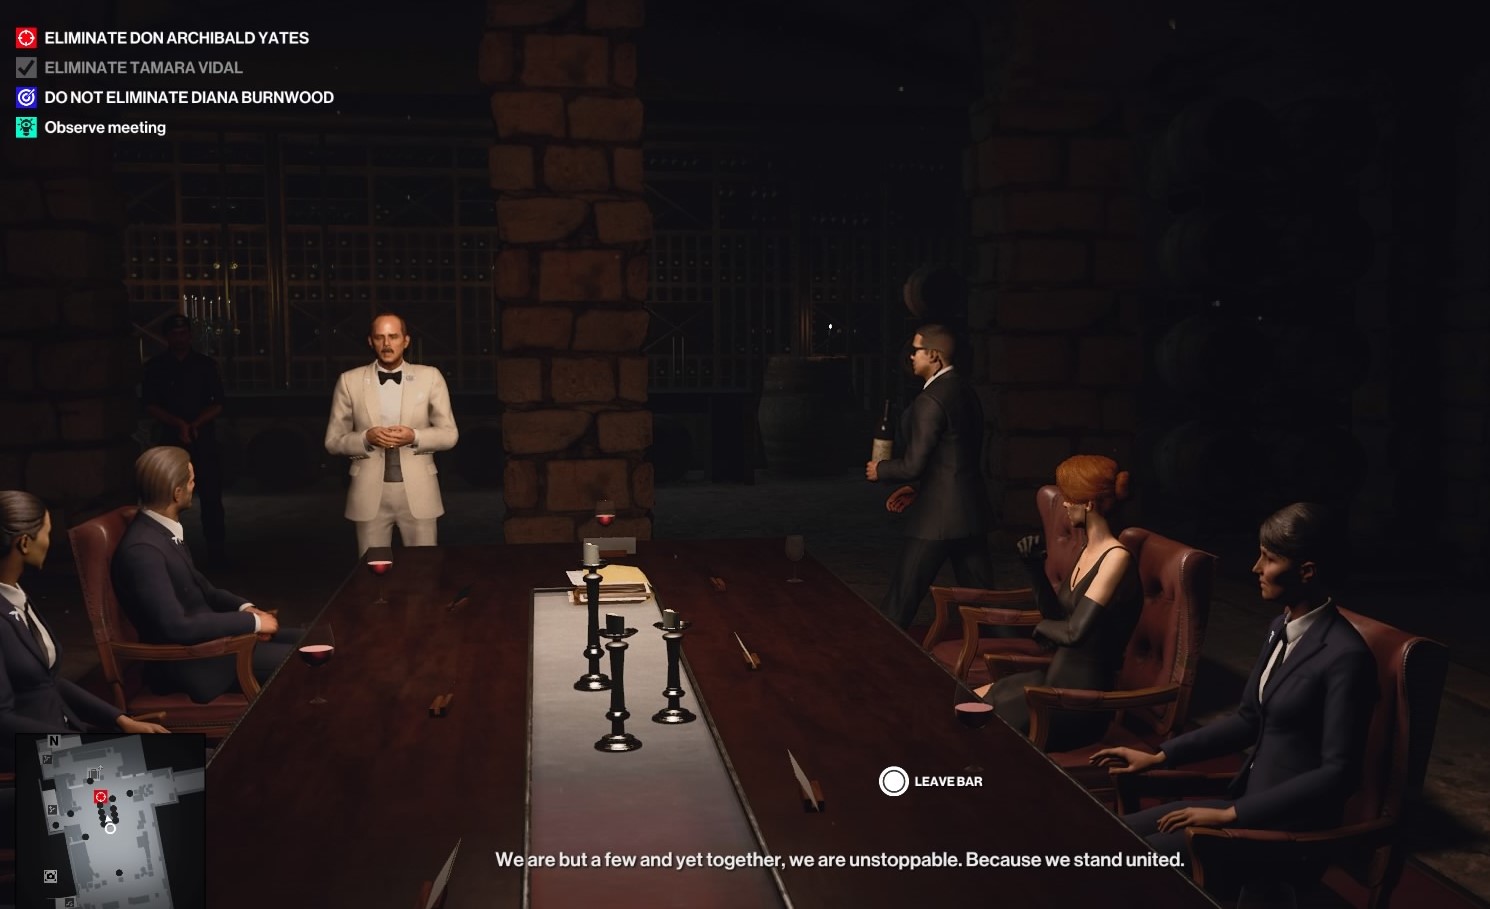
The second target is Tamara Vidal. For, even though Diana has been invited to the exclusive gathering of Heralds at Yates’ estate, she is not trusted. Which is entirely understandable, considering. So Tamara acts as her watchdog and – along with her three bodyguards – never leaves Diana’s side for long.

How To Infiltrate The Place
The very first time you play this mission, Diana will have a little chat with 47 and hand him an invitation to the party. Using that invitation, you will be able to enter with your entire arsenal, as you won’t be frisked.
Progressing your level mastery will unlock more starting points, but for the sake of argument, there are two other ways you can infiltrate the estate, though in this case you will not go to the party directly, but enter the gardens surrounding Yates’s private villa or be escorted into the villa itself.

To do the latter, walk towards the entrance to the party and you will come across a lawyer type talking into his phone. He has some files to deliver to Yates personally and he looks a lot like 47, too. Since he will conveniently pass through a blind spot, you will have little trouble choking him into unconsciousness, hiding his body and taking his disguise. Drop any offensive weapon you might be carrying, as you will be frisked, and walk up to the gate. Infiltration successful. Keep this one in mind, as it leads to one of the fastest ways of eliminating Yates.
The third option is going in Suit Only. This one is not nearly as tricky as it sounds and also leads to the fastest way of completing this mission.
The Fastest Way of Completing The Farewell
Now, opposite from the entrance to the estate you will spot a garage. It is heavily guarded, but, not really. Walk up to the fencing, crouch, vault over then sneak straight onward, vault another fencing, get behind a car and keep out of the sight of the guards as you make your way to the open window across from you.
This will lead you into an empty office and into a hallway which will bring you right up to a closed door. Ignore that one and look to your left, where you will find a way to climb up. Do that but be mindful of the guard patrolling above you. If you can, sneak past him up the stairs between the two huge tanks, and silently take out the sniper and the spotter. I killed both of them using my silenced pistol because I did not want to make any noise.
Then pick up the sniper rifle and shoot Yates in the head once he is standing on the view point left of the villa. Return to the right side of the lookout and watch out for Diana and Tamara Vidal. They will sit down at a table, which gives you ample time to line up Vidal and take her out, too.
Carefully return the way you came, get to the closest exit and you are done! I clocked out at 06:08 minutes when I first tried this, my personal best.

The Story Missions
There are three Story Missions that you will be pointed towards in the Briefing dialogue, but there is – another. As before, each of the Story Missions offers a unique way of taking out one of your two targets.
The Story Missions are:
⦁ Eyes On Target
⦁ Over The Top
⦁ The Tour
⦁ Closing Statement

Eyes On Target
To trigger the Eyes On Target-Story Mission – a neat way of killing Tamara Vidal by proxy – you will have to do exactly what I did when infiltrating the estate Suit Only (read above). But, for this mission, you need a goucho disguise, so infiltrate the way I showed above but sneak into the container below the tanks by using your Lockpick, take out the guard inside, hide his body and grab his disguise. Get up to the sniper nest and listen to the two men converse. They are, actually, on the lookout for 47, ready to intervene, should he be identified. Well. Tough luck. Do NOT take out the sniper and the spotter, since they will do the dirty work for you.

Accept the Story Mission and follow the pointers to pick up an ear piece that will open a line to the spotter. Practice with target identification using your phone’s camera, then go find Diana and Tamara. Take a picture of Tamara and, if necessary, talk to Diana to make her lead your quarry to a spot where she is in the sniper’s line of sight.
Before you can order him to take the shot, though, you need to incapacitate her three bodyguards. Since they will spread out once the women have reached the aforementioned spot, it is quite easy taking them out without being noticed. But, you will need wrenches, bricks, soda cans or whatever to take them out silently and, above all, quickly. Then order the kill and you are done!

My favorite way of killing Tamara Vidal
Surprisingly enough, there seem many more fun ways to kill Don Yates than there are for killing Vidal. My very favorite way to send her off is by poisoning her wine, which has to be a Pinot Noir.
To do that, equip lethal poison and enter the party using the invitation Diana presented to you. Walk straight into the Tasting Room and look to the left of the bar. There you will find a small room. It contains a power switch to bait the bartender and a bottle of Pinot Noir to bait Vidal. Turn off the power, leave the closet, wait for the waiter to enter and follow him, then wait until he has turned the power back on, choke him into unconsciousness, take his disguise and, last but not least, his place behind the bar. Poison the wine glass and top it off with the Pinot Noir once Tamara and Diana arrive.
And done!
Over The Top
The Over The Top- Story Mission is your ticket to taking out Don Yates in a particularly spectacular fashion. But it is not easy to do. I recommend offing Tamara Vidal first by poisoning her wine, as described above, and then, disguised as the waiter, to walk over to the part of the building where you can see the wine tanks and wait for the Mission Story to prompt. So, all you have to do is sabotage the tanks to lure Yates where you want him to be… Easier said than done.

Get down into the pit while disguised as a waiter, find the stairs leading up to the back room where a worker and a security guard are conversing, then grab a screwdriver, the staff key and the security dongle and go back down the stairs. There, you will come across a winery worker which is just the disguise you need. Grab him and hide his body, then pick up the wrench sitting opposite from the crate he was inspecting. And the fuse cell you will also find around that area.
You will also need something to distract the workers in the tank pit (I have no clue how to call that properly). There is an orange you can pick up from a work bench. Or an icicle from the walk-in freezer.

First, distract the worker sweeping the floor next to the power outlet you need to sabotage with the screwdriver. Once he has resumed sweeping, wait for the other worker by the pump to leave, sneak up to the pump and sabotage that, too.
Now, get back to the work bench and put the fuse cell into the high voltage power outlet next to the door. In the meantime, the wine should already be overflowing from the tanks and Yates will be on his way down. Wait until his rant takes him down to the floor, which is when you can electrocute him, along with some unfortunate workers and bodyguards.
And done!

The Tour
This Story Mission – another great way to get rid of Tamara Vidal, with a little help from Diana – will be triggered at two different locations. One is down by the wineyard, the other inside the reception area. So far, I have only concluded it successfully once, but the set-up is pretty much the same. You may join The Tour as the winemaker or as fixer Corvo Black. I will play this as Corvo Black, since this will lead right up to the very exciting Story Mission Closing Statement.
First, listen in on the conversation Corvo Black (is that a reference to Dishonored and High Chaos Corvo having the choice to rule as Corvo the Black instead of reviving Emily?) has with Don Yates. To do that, you will have to follow unseen. Once the call is over, grab Corvo, hide his unconscious body and take his clothes. Join Diana and Tamara Vidal down by the wineyard and let the tour commence. You will have to do something else, first, though.
The first stop will lead you into the winery, and you should pay special attention to the big vat in the background.
At one point, you will be asked if there are any questions. Lead the party up to the vat and ask your question. Diana will provide a distraction for the winemaker, leaving you free to push Tamara into the vat for an unnoticed kill.
Funnily enough, when I did this Tamara’s body came hurtling back out and landed at Diana’s feet, but of course there was no reaction from the NPCs.

Continue the tour and meet Don Yates. While Diana will be invited to some secret Herald meeting, Corvo Black / 47 will be told to stay put. If you stick around the barrel room, the fourth Story Mission, Closing Statement, will be revealed. To follow that, you will have to become the resident sommelier and bring along a bottle of very vintage wine.

Remember the security dongle? This is your way into the very secure vault where the vintage is kept. So, in each corner of the barrel room you will find ladders leading down. Use one of those, preferably the one to the right of the vault, use the dongle or a screwdriver to open the hatch, climb back up into the vault and take out the two men there. Best dimm the glass fronts before going on. Disguise yourself as the sommelier, then use the code given up previously by the security chief (1945) to disable the laser grid and grab the wine.
Follow the security chief to the secret meeting and present the wine. Observe the events unfolding before you, then make your way as quickly as you can, and as unobtrusive as you can, up to Yates’ villa. You can climb up onto the roof, btw, as it is best to avoid going through the building and up the stairs. Best hide on the balcony where a table for two is set and wait.
Shortly, Diana will arrive with her escort. One guard will walk out to the balcony where you are, the other to the one on the other side of the room. The third stays with Diana. Take down each of the three guards quietly, hide their bodies and all evidence, then grab one of their uniforms and wait, as instructed.
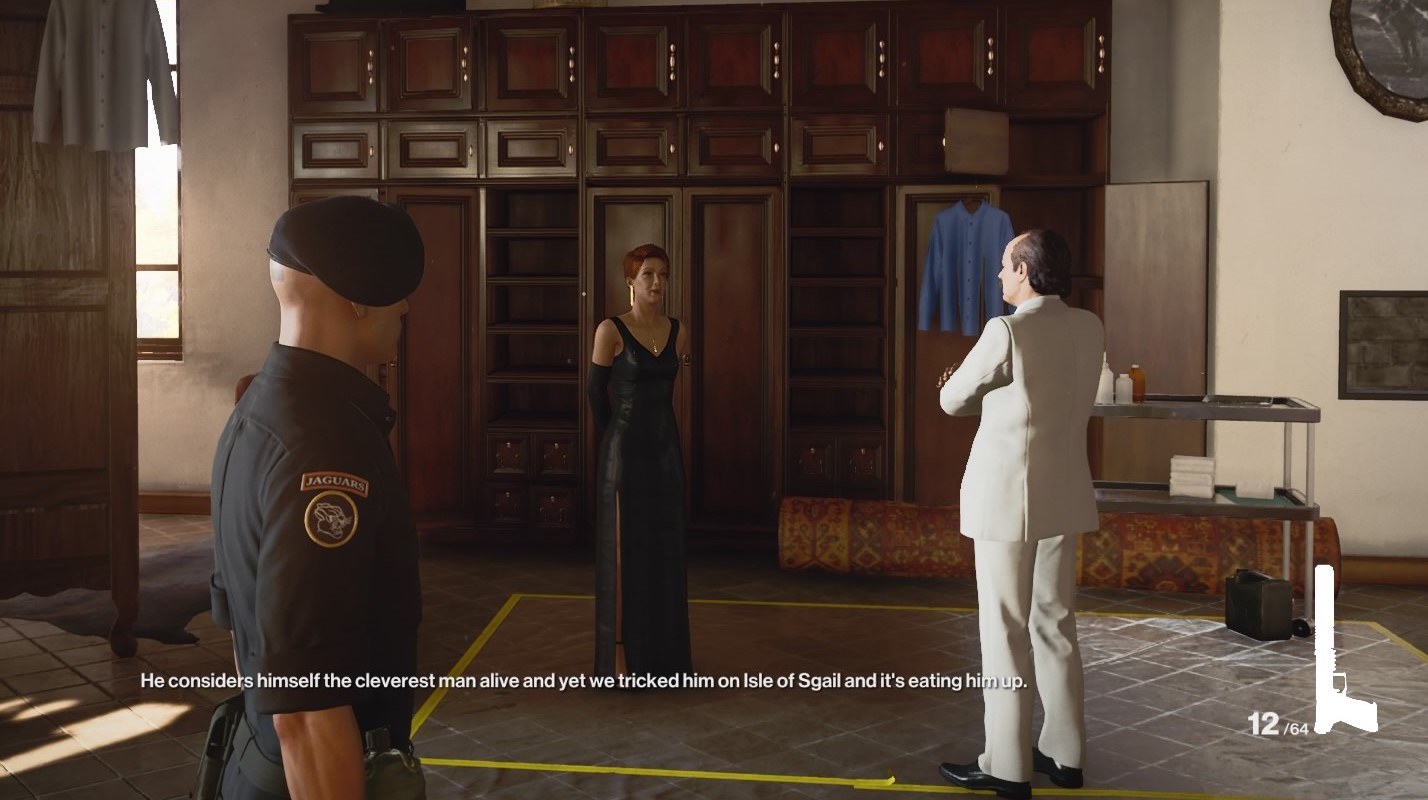
Once she provides a distraction, take out the remaining guards and kill Yates. Diana will then ask you to meet her on the dance floor and to dress appropriately. Which of course you will by choosing the legendary suit hanging from the dresser.
And you are done!
Even More Ways Of Killing Yates
I mentioned in the beginning that you can easily get to Yates from the start by dressing up as the lawyer. If you do that, you will be shown into a ground floor office inside the villa. Use your briefcase to knock out the guard left with you, hide the body in the cupboard then place the files Yates is waiting for on the desk. Leave the briefcase where it is.
Shortly, Yates himself will show up, but his bodyguard will notice that something is wrong when he sees the briefcase on the ground. He will search about a bit then leave with the briefcase. In the meantime, present your findings on Diana Burnwood to Yates and, when the time is right, use the pen to stab him. Hide his body where you put the guard and leave. Easy!
If you would like to kill Yates by proxy, you need to snoop around the Yates’ bedroom to find out when they were married (2006) and then gain access to the cellar (the key is on one of the tables in the room, as is the key to Yates’ car). Best grab a guard’s disguise on your way since you will need that to approach Yates’ wife with the files you uncovered in the cellar’s safe.
Then all that is left is to sit back and wait for some personal vengeance before you can drive off into the sunset, provided you killed Tamara Vidal already.
Oh, and you can find a vial of lethal poison in the couple’s bathroom, btw. In case you need that.
And that is it for Mission 5, The Farewell!
Thoughts (Spoilers) on A Necessary Evil
Immediately after Mission 5 the interlude A Necessary Evil will play out. We already knew that Diana wants revenge for her family’s death at the hands of 47. If you play from the very beginning and approach Diana before she enters the party, she will touch 47’s hand with her glove, which rightfully raises his suspicion. She has another chance to touch his bare hand later on, when they tango.
The neurotoxin applied to his skin will incapacitate 47 during their confrontation, rendering him helpless. Which is pretty low, right?
But while I found that scene absolutely awesome and saw through Diana’s “betrayal” right away, I could not get over how the game ignores the other, very common outcome: If you neither speak to Diana in the beginning of the mission nor choose to tango with her after, 47 will STILL fall prey to the poison, even though SHE NEVER TOUCHED HIS HAND!
Well.
I won’t post a playthrough for Mission 6 because there really is nothing much to do other than kill everyone in your path any which way. No room for fancy stealth. You got this!
Instead, I will detail my short and sweet encounter with an Elusive Target in The Iconoclast.
Until then, keep on playing!
Cheers
Vanessa
